

Top Tips for Replacing Your Water Heater Thermostat in Vidor
Step-by-step instructions and practical advice for homeowners in Vidor to successfully replace their water heater thermostat.
If your showers have turned lukewarm or your energy bill in Vidor has crept up, your water heater thermostat may be the silent culprit. Learning how to replace water heater thermostat Vidor homeowners trust can restore hot water consistency and improve efficiency quickly. In this guide, we will walk through safety musts, tools, step-by-step basics, and post-install testing so you can proceed with confidence. We will also flag the red-line situations when calling a licensed pro is the safest and most cost-effective choice. Along the way, you will see examples from real homes around Vidor, Orange, Beaumont, and Bridge City to make each step feel familiar. Whether you manage the fix yourself or partner with a local specialist, these tips will help you protect your equipment, your budget, and your family's comfort.
Safety and tools to replace water heater thermostat Vidor homeowners need
Before touching any water heater components, shut off power at the breaker for electric units and confirm zero voltage at the access panel with a multimeter. For gas heaters, set the gas control to pilot or off, and follow the manufacturer's instructions for safe handling around burners and pilot assemblies. Safety glasses, cut-resistant gloves, and a non-contact voltage tester are essential to reduce risk while working in a confined utility area. Keep the workspace dry and clear, and never work on a unit that shows signs of active leaks around wiring or the control cavity. When in doubt, consult your heater's manual or an authoritative resource such as the U.S. Department of Energy for safe water heater best practices.
Gather the basic tools to streamline the job and minimize trips back and forth across your garage or utility closet. A Phillips and flathead screwdriver, a digital multimeter, needle-nose pliers, and a small adjustable wrench cover most thermostat removal and installation tasks. Many Vidor homes use dual-element electric tanks with upper and lower thermostats, so ensure you have a compatible replacement for your brand and model before opening the access panels. Homeowners often add insulating foam pads behind access panels to reduce standby losses, which can shave a few dollars off monthly bills over time. If you do not have the manual handy, manufacturers like Rheem and A. O. Smith publish model-specific thermostat information online for reference.
Step-by-step basics to replace water heater thermostat Vidor residents can follow
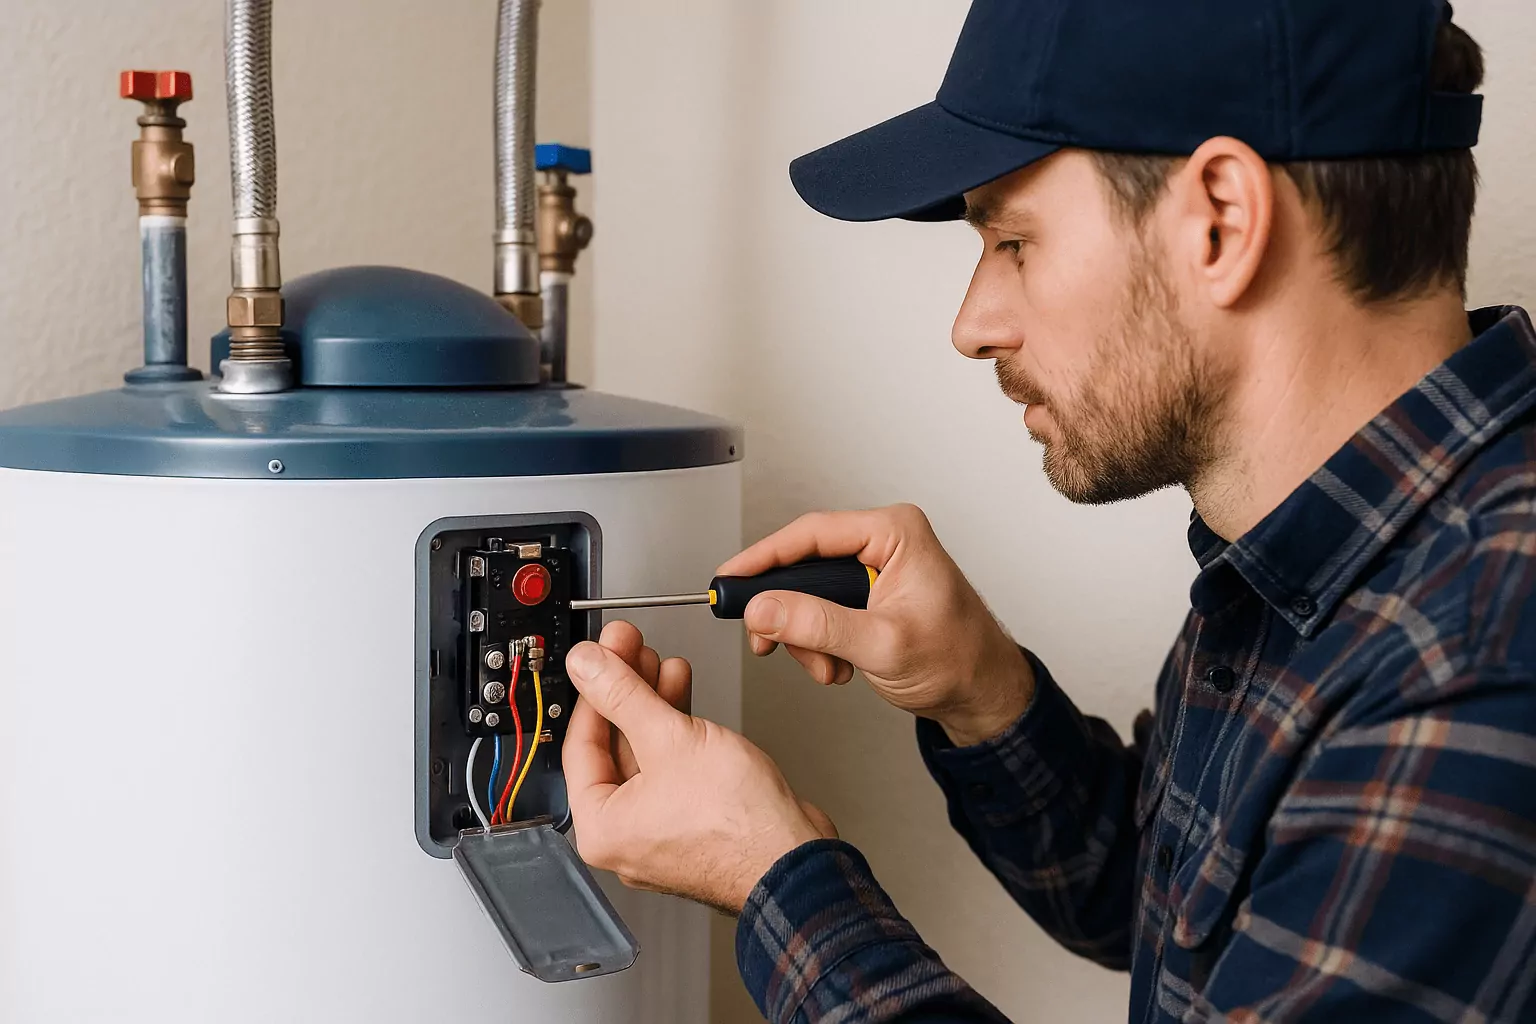
Start by removing the metal access panel, gently lifting any insulation, and carefully peeling back the plastic safety cover to expose the thermostat and element terminals. With power off and verified, photograph the existing wire positions so you can replace each conductor correctly later. Loosen the terminal screws enough to slide out the wires, then release the thermostat's spring clip by lifting the lower edge and tilting the control forward. Inspect the tank surface behind the thermostat for rust, moisture, or scorching, which can indicate a bigger issue like element failure or chronic overheating. If there is moisture present, pause and address the leak source before proceeding to protect your new part from early failure.
Seat the new thermostat snugly against the tank surface, making sure the sensing plate sits flush for accurate temperature readings. Reconnect each wire to its original terminal, torque the screws firmly without over-tightening, and re-install the safety cover and insulation pad. Set the initial temperature to about 120 F, which the Consumer Product Safety Commission and many manufacturers recommend to balance comfort, scald safety, and efficiency. For dual-element tanks, repeat this process for both upper and lower thermostats, verifying wiring against your photo and label markings. Replace the access panel, restore power at the breaker, and allow the unit 30 to 60 minutes to reach the new setpoint before testing at a nearby faucet.
Troubleshooting and testing after you replace water heater thermostat Vidor
After re-energizing, run a hot water tap for several minutes to purge cooled water and let fresh hot water reach the line, then check temperature with a kitchen thermometer at the faucet. If temperature fluctuates wildly, one thermostat may be mis-seated or an element may be partially failed, causing inconsistent recovery or short cycling. Use your multimeter to confirm voltage at the thermostat terminals and continuity across each heating element after power is off again. In many Vidor case calls, homeowners discovered a failed lower element mimicked a bad thermostat because hot water started strong but turned cool quickly. If your readings do not match the manual's specs, replace the suspect element or consult a licensed technician to avoid repeated failures.
Monitor energy usage and recovery times over a few days and listen for unusual noises like hissing, popping, or clicking from the tank. Sediment buildup on elements can cause noise, slow recovery, or inaccurate thermostat performance, so flushing the tank annually is a smart preventative step. You can review maintenance tips and related services to support your project by visiting our local team's page at water heater services, where you will find additional troubleshooting resources. If you need a second opinion, schedule a quick diagnostic via our contact form, and we can verify temperature controls and elements using pro-grade instruments. A stable, quiet tank that consistently reaches your setpoint is the clearest sign your thermostat replacement went right.
When to call a pro in Vidor, Orange, Beaumont, or Bridge City
There are times when expertise and specialized tools are the safest investment, especially when dealing with repeated breaker trips, melted wiring, or scorch marks inside the access cavity. If the tank shows active leaks, corrosion around the thermostat well, or inconsistent voltage readings, a licensed technician should evaluate the system before you proceed. In one Vidor home near North Main Street, a homeowner attempted a DIY swap but recurring tripped breakers ultimately traced to a pinched conductor behind the thermostat clip, which a pro resolved in one visit. Another Orange, TX case involved a dual-element tank where the upper thermostat worked, but a cracked lower element caused erratic temperatures and higher bills until both parts were replaced correctly. If your unit is older than 10 years or exhibits multiple symptoms, a comprehensive check can prevent further surprises and extend system life.
Local availability and quick response matter when hot water is out during a busy week, so partnering with a nearby expert keeps downtime short. Our team serves Vidor, Orange, Beaumont, and Bridge City with same-day thermostat and element replacements in most scenarios, and we carry common parts for leading brands. To compare DIY vs. pro options, explore our service offerings and typical timelines at 409 Plumbing services, or browse tips on upkeep at our water heater maintenance blog. If you have photos of your wiring, model plate, or a tripped breaker, include those when you reach out so we can advise faster. When safety, warranty protection, or time constraints top your list, a quick call can be the most efficient route to reliable hot water.
With the right safety steps, tools, and testing approach, replacing your water heater thermostat in Vidor can be a straightforward project that pays off in comfort and efficiency. Start with power-off verification, document your wiring, mount the new control flush, and confirm stable temperatures at the tap to validate the repair. If symptoms point to element damage, wiring heat, or gas control issues, protect your home and budget by bringing in a local pro who sees these challenges every week. For fast help in Vidor, Orange, Beaumont, and Bridge City, call 409 Plumbing at 409-444-0066. Explore services and book a visit at our services page or request an appointment on our contact form so we can get your hot water back on track today.
Frequently Asked Questions About Replacing Water Heater Thermostat
How do I know if my thermostat is the problem or if it is the heating element?
Start by noting the symptom pattern, because it offers helpful clues before you open the panel. If water starts hot then quickly turns lukewarm, the lower element or lower thermostat commonly fails, since the upper section provides the initial burst of heat. If there is no hot water at all, the upper thermostat or upper element may be at fault, or a breaker may be tripped. With power off and verified, use a multimeter to check continuity across each element and to confirm voltage arriving at the thermostat. A good element will show continuity, while an open circuit indicates failure, and a proper voltage reading at the thermostat confirms the control is being powered as expected.
Is it safe to raise my water heater temperature above 120 F after replacement?
Most households find 120 F delivers a comfortable mix of safety and efficiency, reducing scald risk while limiting energy consumption. Raising the setpoint can improve dishwasher performance or accommodate unique needs, but each 10-degree increase adds energy use and elevates scald risks, especially for children and seniors. If you must increase temperature, consider installing mixing or tempering valves at the tank outlet to moderate delivery temperatures at fixtures. Monitor your water at the tap with a thermometer after adjustments and label the water heater clearly with the new setpoint. For more on balancing comfort and safety, the Consumer Product Safety Commission resource at https://www.cpsc.gov/Safety-Education/Safety-Education-Centers/Scald-Prevention is a useful reference.
Can I replace a thermostat on a gas water heater the same way as an electric model?
Gas water heater thermostats integrate with the gas control valve and burner assembly, so procedures differ from electric models and often require specific leak checks and ignition safety steps. You should always follow your brand's manual for gas controls, and many homeowners choose professional service to ensure safe gas handling and proper combustion. If you smell gas, hear hissing, or see soot buildup around the burner area, stop immediately and ventilate the space before calling a technician. In many cases around Vidor and Orange, swapping a thermocouple or flame sensor, not the thermostat, corrected intermittent hot water on older gas units. When working with gas, err on the side of caution and schedule service if anything appears out of the ordinary.
Will replacing my thermostat reduce my energy bill, or should I also flush the tank?
Replacing a malfunctioning thermostat can absolutely stabilize setpoints and reduce wasted runtime, which directly helps energy efficiency. However, sediment buildup acts like a blanket on your heating elements, slowing heat transfer and forcing the unit to work harder for the same result. An annual flush, anode inspection, and thermostat calibration check often combine to deliver the best efficiency gains in Vidor's mineral-rich water conditions. After a thermostat install, track your electricity or gas usage over a billing cycle and compare to prior months to quantify improvements. For broader energy-saving strategies, the Department of Energy's water heating guidance at https://www.energy.gov/energysaver/water-heating offers credible, up-to-date tips.

Registered Master Plumber Texas State Board of Plumbing Examiners
RMP #44702
Licensed and Bonded
Cities Serviced
409 Plumbing
Follow Us On
© 2026 409 Plumbing. All Rights Reserved.
Website Design and Hosting Provided by LocalBizBuzz,co